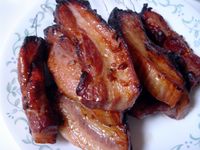
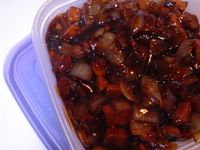
As luck would have it, a blog that I frequent, Su Good Sweets by Jessica did a post on baked char siew pao for Chinese New Year. Her char siew looked delicious so I followed Jessica’s recipe for the barbecued pork and filling. These are the product.


I actually selected the wrong cut of meat and ended up with way too fatty meat, so I had to cut most of the fat out after the meat was baked (Libby had a nice snack on that day).
Upon hearing my intention to make steamed char siew pao, Jessica was kind enough to offer a couple of dough recipes. I was going to try the recipe from I was just very hungry but the photo didn’t look like the typical dim sum char siew pao, so I decided to go with my friend Hsin-li’s mom’s tried and true family recipe.
I cut her recipe down to 2 cups of flour, necessitating the 3/5 conversion factor for everything else. Why I didn’t cut down the flour more and just make it half will forever be a mystery. The following is the recipe I used to make the dough:
A:
2C (240g) flour
1 ½ tsp baking powder
2 tbsp potato starch
1/2+ tbsp oil
3 tbsp sugar in 4 oz H2O
B:
½ tsp yeast
1 ½ tbsp lukewarm water
½ tsp sugar
1. Combine ingredients A and B and knead for 10 mins. Cover with wet teacloth to proof for 1 to 1.1/2 hours. Punch down and knead at least 20 times. Rest dough for 10 mins. If the dough pulls back, the rest time is insufficient, extend the rest time.
2. Divide dough into 1 oz pieces and fill with chosen filling. As you pleat the closing, be sure not to grease the edges so that the dough will stick.
3. Steaming time: 15 mins for each 1 to 1.1/2 oz dough pao
* Wrap lid of steamer with teacloth to prevent codensation from dropping
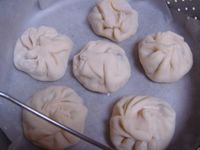
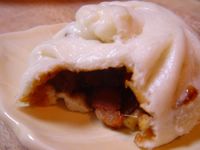
This is when the paos are ready to be steamed, and the final product. Not too good looking because I was greedy and rolled the rounds too big, resulting in skin that’s too thin. Combined with the fact that I didn’t use a towl to catch condensation, some of my paos leaked, as you can see from the picture.


The verdict? I thought the filling was close enough to the real thing, although I prefer mine really sweet, so next time I will add more sugar. The dough, however, is still not the same as the dim sum pao, but it’s a whole lot better than the one I came up myself so I will definitely use it again. Jason, ever the critic, said I shouldn’t call it char siew pao at all because it was a completely different thing. Supportive, huh? Our friend Danny (Hsin-li’s husband) was more forgiving in his evaluation. Although surprised that he had never had homemade pao at his in-law’s house, he praised the pao dough but also admitted that it’s different from the dim sum version. He thought the filling was very good and almost the same as store bought ones but mine was leaner, therefore not as soft. Must be because I trimmed off all the fat before cooking the barbecued pork.
Now, where oh where am I going to find a restaurant recipe for the fluffy dough? I wonder if they put something really bad in it to make it fluffy like that, which is the reason they don’t want people to know.


 Stumble It!
9 comments:
Really? Maybe I'm not doing something right. Let me know if she thinks of anything.
Thanks for the mention! I'm glad the filling turned out rather well, but *sigh*, the dough evades us. I'm so not a bread baker. There's all this stuff about proofing, biga and starter that I can't keep track of.
Yeah, bread is hard. I am ok with most, but am in a constant struggle with my sourdough starter.
BTW, it's sour again.
Looking at your pics, I think you started the steaming process too soon. With our ambient temperature in Singapore and the 36 paos i get with the recipe, it takes me about 20 - 30 mins to fill them all, by which time the first 6 are ready to go into the steamer. I think Tokyo temps in winter may require a little more time for the second rising. You may find allowing extra time for the paos to double in size (covering with a damp tea towel will help it along) will improve on the texture. Sorry about not mentioning this earlier.
Another thing are the squares of grease proof paper to rest the filled paos on. Things I take for granted, sorry!
Ah, thanks for the pointers. That must be it. Since I cut down the recipe, I only made ten, which I steamed in two batches. So I don't think they had enough time to rise.
I did line the steamer with parchment paper, but got lazy and used one large sheet instead of cutting them into squares. This might have also contributed to the leaky pao because the water condensed on the lid had no where to leak down to.
I've always wanted to make paos. Will try your recipe with all the notations on the dough. Will also try it on a traditional bamboo steamer, that's what I see the restaurants use.
Hopefully, I get to trying this out soon. :-)
try this bao skin recipe
it gives good result :
300 gm Hong Kong / bao flour
1 tsp double-acting baking powder
1/4 tsp salt
3 tbsp sugar
1 tbsp shortening
1 tbsp yeast
100-150 ml water - depend on flour
mix all ingredients. Knead till smooth n elastic. Proof till double in size. (I use a breadmachine here) :)
punch down, divide dough into equal pcs (abt. 30g wt each).Rest dough 10 min.
Wrap with filling and shape. Place each bao on a pc of greaseproof paper.
Proof for 30 min.
Steam on high heat 8 - 10 min.
Post a Comment