Friday, June 17, 2005

SHF#9: Sweet Tomato Tart


Life in Flow is hosting the ninth edition of Sugar High Friday and the theme is Tantalizing Titillating Tempting Tarts! Since I am a self-proclaimed queen of tarts, I simply have to make an entry to this one, if only I can figure out how to submit my entry (technical problems). But even if it never makes it into the SHF roundup, it’s ok too, because it is something that I’ve been meaning to try for a long time.

My favorite neighborhood patisserie came up with a cherry tomato tart a couple of summers ago. I’ve eaten it a few times and really liked it, but maybe the idea is not universally appealing so now they have taken it out of their summer rotation. In its place, they are selling a new tomato mousse tart with strawberries and tomatoes on top, but I still prefer the old version better, with only tomatoes.

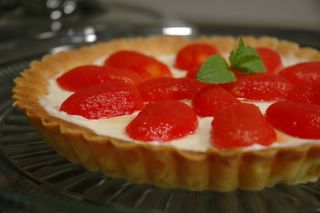
So I set out to make my own version of a sweet tomato tart. I found some oblong shaped mini tomatoes in the supermarket that are sweeter than the normal cherry variety and decided to try them. The skin on these tomatoes are rather thick so I cut them in half and roasted in the toaster oven for about eight minutes, just enough that the skin comes off easily but before the tomatoes lose shape.

For the tart base, I decided to use the pate sucree recipe that I learned in cooking school. Here’s how:

Makes one 18cm tart, or double recipe to make 10inch tart.
Ingredients:
Unsalted butter 60g
Pinch of salt
One egg yolk
Vanilla essence (or oil) 3-4 drops
Cake flour 80g
Almond powder 30g
Powdered sugar 50g
Bread flour for dusting

Preparation:
1. Sift together cake flour and almond powder twice, store in fridge until use.
2. Place powdered sugar in fridge before use.
3. Bring butter to room temperature.
4. Butter and flour the tart pan. Place in fridge to prevent butter from melting.

Making the dough:
1. Clean and disinfect a large area of the counter.
2. Place the mixture of cake flour and almond powder on the counter and make a big well out of it using a plastic scraper (diameter of well should be twice the width of scraper)
3. Place the remaining ingredients inside the well in the following order: powdered sugar, vanilla oil, salt, butter, egg yolk. As much as you can, try not to let the ingredients touch each other, and block the egg yolk from the sugar with a wall of butter. (This prevents sugar from absorbing water in the egg yolk, leading to clumps)
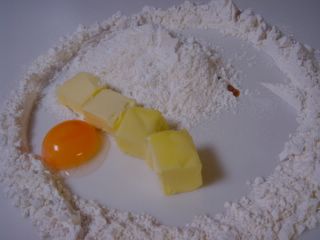


4. Using your fingers, squeeze butter and egg yolk together until completely incorporated.
5. Use scraper to cut into butter the powdered sugar, then flour mixture.

6. Gather all the dough in front of you with the scraper. Using the heel of your hand, push a portion of the dough the size of a golf ball away from you on the counter. Repeat in a radiating pattern until all the dough is pushed away. Gather up dough and repeat. At first the dry ingredients will separate from the butter mixture,


but after three to four repetitions, the dough should come together nicely. Do not over-knead, otherwise gluten will form, causing the dough to become hard and also shrink while baking.
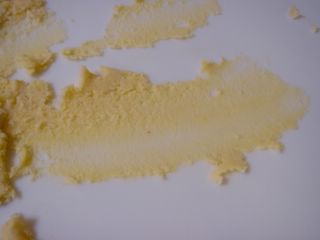
7. Pat dough into a round disc, and place inside freezer for 15 minutes or fridge for at least one hour.
8. Dust counter with bread flour (particle size of bread flour is larger than cake flour, so it’s better suited to prevent sticking) and roll dough out into a disc and line the tart pan, prick all over with fork.
9. Bake in 350F/180C oven for 15 minutes or until golden.
10. Cool on rack and invert out of tart pan.

Filling:
1/6 cup sour cream
½ cup mascarpone cheese
1/8 cup sugar
¾ tsp finely grated lemon zest
pinch of salt
roasted mini tomato halves with skin removed (enough to line top of tart)

Glaze:
1 tbsp apricot jam boiled with 1-2 tbsp water until desired consistency is reached.

Whisk together all the fillings ingredients except for tomatoes and spread in cooled shell. Arrange tomato halves on top of filling. Brush the tomatoes with glaze to prevent from drying out.

All in all, it worked out ok. The dough gets soft really quickly so I wasn’t able to get the complete piece of rolled out dough into the tart pan. After two tries, I gave up and patched it up in the pan instead. It still worked out really well and came out effortlessly, and my tart pan doesn’t even have a removable bottom. Despite my convoluted description, it is actually really easy to make the pate sucree. Using this method, you get a really nice almost fluffy texture. Never will you have the problem of the unbreakable tart bottom because this one crumbles nicely under a slight stab of the fork, yet holds up nicely for easy handling.

The cream filling is nice and tasty, but not exactly what I had in mind. Thinking back, the original filling had more of a custard feel. The tomatoes and fillings were probably baked with the tart base too, because if I remember correctly, the custard also had tomato taste in it. Oh shucks, it’s been so long since I had the real thing that I can’t remember exactly what it’s like. I guess I will just have to settle with my version of it for now.

Update: the host at Life in Flow graciously gave me his email address so it looks like the tomato tart will make its way into the SHF roundup. Thanks, Redbeard for uniting tart lovers all over for this SHF!

Wednesday, June 15, 2005

Pierre Herme: Emotion Eden


Ok, I’m going to come clean and tell you that I actually had this a while ago, shortly after I came back to Japan. I know some of you have been waiting for another PH review, and I really did mean to tell you about it sooner, but what can I say? Life as an unemployed bum can sometimes get so busy.

Ok, first let’s get this out of the way. Someone asked me for the address of the Pierre Herme store on Aoyama-dori, so here it is. It’s in La Porte Aoyama (5-51-3 Jingumae, Shibuya-ku) next to the UN building. The closest station is Omotesando on the Ginza or Hanzomon line, exit B2.

Anyway, as I was saying, soon after I came back to Tokyo, I noticed a distinctively citrus theme at the PH store. A couple of times I passed it on my bike but was always in a hurry and didn’t have time to linger and check out the new window display, but I did spot a new addition to the Emotion range that looked oh-so-lemony. Or so I thought.

The glistening golden jelly piled on top of Emotion Eden is actually saffron flavored. If you look closely, you can actually make out the crimson threads. Well, maybe not in this photo, but trust me, they are there. The next layer is a compote of peach and apricot, followed by saffron infused cream on the very bottom. The saleslady again told me that I must scoop up all the layers so that the saffron flavor does not overwhelm me. This hardly worries me as I am a huge fan of saffron. When I asked if this was going to be a summer item only, she assured me that if enough customers like it, it will be available year-round. But just in case, you should go and try it before it disappears for good.

That night, Emotion Eden received rave reviews. Jason practically licked the glass clean and went on to say that out of all the Emotions, Eden is his favorite. You really have to taste it to believe that yes, apricot and saffron are the perfect match. Jason claims that he has no idea what saffron tastes like, but I do suspect that you’d have to really love saffron to like this dessert, because despite the strong peach and apricot flavors, the saffron shines through. Again, no complaint from me, but don’t say I didn’t warn you.

Past Pierre Herme entries:

Emotion Ludic & Inca

Desire

Emotion Ispahan

Monday, June 13, 2005

Here We Go Again

The idea of an herb garden from which I can pick fresh ingredients to cook a tasty meal has always appealed to me. Never will I have to think of ways to use up an entire bunch of dill when all I needed was one tablespoonful, or resort to dry herbs for less than satisfactory results.

My inspiration in the gardening area is my mother, who diligently starts a vegetable garden every spring with cucumbers, tomatoes, and winter melon as anchors, plus some other things that strike her fancy that year. Come summer, we have an abundant supply of juicy cucumbers, and the plump tomatoes are so sweet that it is almost a waste to tamper with the taste so I chomp on them like apples. You can see that the desire to garden runs in the family. I say desire because I obviously did not inherit her talent. I’m ok with green houseplants that don’t flower or bear fruit. I have a huge palm-like plant that we’ve had for years and it’s grown so big that when I sit underneath it on our teakwood indoor recliner, I feel like I’m on a tropical island under a palm tree. My luck with plants, however, ends when it comes to anything that has any utilitarian function. Virtually all flowering plants we buy end up dying within a month, be it peony, peach blossom or gardenia. The ones that do manage to survive are turned into green houseplants that never ever bloom again. The fruit trees last longer, but not by much. I think our little olive tree lived for a year (never bearing any olives), but the mini orange tree dried out like a stick in less time than it took for the oranges to fall off (the tree was full of oranges when we bought it).

My luck with herbs is not that much better. I cannot remember how many parsley plants I bought, only to have them wither into yellow threads a week later. And you probably remember the poor rosemary plant that didn’t survive my business trip last year. One year I was extra ambitious and bought seed already sowed into little dirt cakes that expanded when I poured water on it. They all germinated all right, but I timed it badly so when we came back from ten glorious days from the Maldives, the little seedlings had all disappeared and all I had were shrunken dirt cakes. With a track record like this, you’d think I would’ve stopped trying a long time ago and resigned to the fate of buying herbs from the market. Oh no, not this determined wannabe gardener. Spring after spring, I try again and again. After all, two of my little rosemary plants did survive the winter last year, so maybe my luck is turning after all.

This year, I wasted no time in buying the seedlings right after I came back from the US, because you see, I only have 6 weeks to cultivate my dream herb garden before we go on our Tibet trip and leave the herbs to fend for themselves.


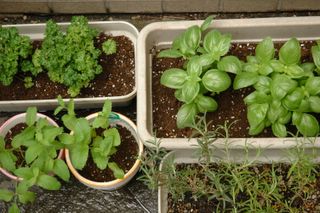
Now, two weeks later, the basil plants are thriving but the parsley is dying a slow death; the two kinds of mint are still hanging in there, but I don’t know for how much longer; and both rosemary plants are completely bald now after I snipped off some for a steak marinade.

I’m also keeping my finger crossed on the cucumber. They are not pictured here but Jason was interested in growing them so I bought three a week after the herbs were planted. I was hoping to harvest them at least once before leaving for Tibet, but my gardening consultant (i.e. my mom) told me today that it usually takes six to eight weeks. Umm, maybe one of my neighbors can be bribed into coming to water them and reaping in the cucumbers as reward?

Thursday, June 09, 2005

The Nice People at Allrecipes.com

Last week, I received an email from the creative director of Allrecipes.com, the website that I use frequently for everyday meals. He said that in appreciation of all the photos I submitted, they wanted to send me a free Dinner Tonight cookbook. How nice of them to do such a thing!

Here’s a little background. Allrecipes.com started the photo feature at the end of last year. They encouraged readers to submit photos of their cooking to the website, as well as personal photos. Acutely aware of my memory problem, especially when it comes to names of absolutely everything, including dishes, I immediately recognized it as a good way to keep track of the recipes that I have tried on that site. So I faithfully took a picture of my dinner every night. If I had time I’d add some styling touches, but more often than not, the pictures were snapped in the kitchen seconds before they were brought out onto the dinner table, sometimes with Jason tapping his foot going, “Is it necessary to take a picture of EVERYTHING?” Lack of moral support notwithstanding, I persevered, and have submitted over one hundred food photos so far. Some of the early ones actually look quite horrible and unappetizing because I was still trying to figure out the fluorescent light in my kitchen, but I do have some that I am quite happy about, especially the ones I took while I was back in the US, with a skylight above the dining table.

This is one page of my photos on Allrecipes.com, and you can hit the back/next button on the bottom to see more.

It's just such a nice feeling to know that someone does appreciate your efforts, isn't it!

Wednesday, June 01, 2005

I Scream for Ice Cream


Ever since I saw the lovely picture of the brownbread ice-cream that Keiko made, I knew I had to put ice-cream maker on the top of my shopping list when I was back in the States. I decided on the 1.5 Qt version made by Cuisinart because of its sleek design, and its perfect size to stuff into my suitcase. Since it doesn’t make a ton, hopefully there won’t be any detrimental effects on my waistline, hopefully.

I was going to show a picture of the mouthwatering mango sorbet that I made back in the States (Cuisinart’s original recipe) posing next to my ice cream maker, but the picture was taken hostage in a damaged CD. So I guess you’ll just have to take my words when I say it was not only the most flavorful sorbet I’d ever eaten, but had the best golden color and firm texture, superior to any commercial sorbet.

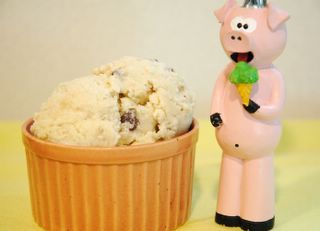
My first attempt at making ice-cream, however, was somewhat of a disaster. It was after I came back to Japan. Eager to show off my brand new toy, I made a batch of banana ice-cream from a recipe found on the internet. The cooled mixture did not solidify at all after churning for half an hour in the ice-cream maker. I went back to the recipe but didn’t find anything that I had done wrong. It was only after cross-referencing other recipes that I found the problem. I think I was supposed to cook the mixture until it resembles custard, but the recipe was not clear on that and I had stopped cooking way too early. To salvage the situation the best I could, I re-cooked the mixture, to the effect of a gooey lumpy mess. I don’t know whether it’s due to the double-cooking or the fact that I had substituted all the milk with skim milk, the resulting ice-cream tasted like wax. To top it all off, the chocolate chips that I decided to throw in at the very last minute tasted like steel bits after they’ve been frozen. Although I would’ve been happy to throw the whole thing down the drain, Jason and the in-laws ate every last bit of it graciously (half of it made into a milk shake with ground black sesame added in, which was actually pretty good), saying that it wasn’t bad as a first attempt.

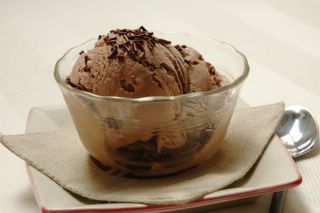
Knowing the ice-cream maker can do better than this, and determined not to let the in-laws leave Tokyo with nasty aftertastes of the waxy ice cream, I tried again. This time, it was a simple chocolate ice cream, and I spared no calories. It made me feel full just stirring all that cream into the mixture, but I was rewarded with such creamy texture and silky taste, it was worth risking a clogged artery or two, just this once. If this ice cream maker wants to see the light of the day often, I will have to find some low fat and tasty recipes.


Wednesday, May 25, 2005

Home is Where the Dog Is


Make that a smelly dog, for in my absence last month Jason did not bother to bathe Libby. Even though Libby is one of those dogs that don’t naturally smell (lucky us), she does like to roll in the grass whenever she gets a chance and whatever smell in the grass that appealed to her is usually foul to us human noses.

Besides a stinky dog enthusiastically welcoming me with little yelps and spinning tail, I was also greeted with piles of paperwork waiting to be taken care of, along with a yard full of weeds that crept up while I was gone. But you know what? Even the weeds at home look lovelier than the weeds elsewhere.


It’s good to be home.

Thursday, May 12, 2005

Want seconds?


This, my friends, is called Dobos torte, a death-by-chocolate kinda dessert that makes your blood sluggish and your artery clogged up like outbound Rt. 66 on a Friday afternoon. I have wanted to make this for so long, but I knew I had to share the artery clogging aftereffects with people dear to my heart. So I took it to a get-together of friends from high school last weekend. It’s only fair that we share this health hazard the same way we shared our SAT angst years ago.


Everyone gobbled up their piece and took home seconds. If you are wondering if it’s as rich as it looks, that’ll be affirmative. Being a torte, it was very dense and half way through my slice, I wished I had divided it into 16 portions instead of 12. I also wished I had left out two cups of sugar in the buttercream instead of just one. Oh well, next time (if there ever is a next time).

Recipe here.

Monday, May 09, 2005

Cooking ABC – April

April was a busy month for me at ABC cooking studio. I was taking free trial lessons, regular lessons, and I was only in Japan for the first two weeks because of my trip back to the US, so let’s get started before I forget even more details.

I was interested in two out of the three cooking menus offered in April, the first one being brunch with omelet.


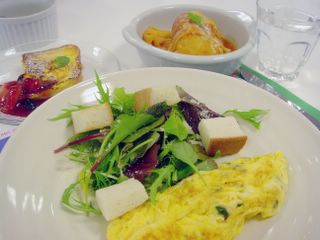
I almost always order an omelet with ham and mushrooms whenever I have breakfast at one of the nicer hotels because I just can’t make an omelet fluffy enough for me to want to eat it myself. I thought this was the perfect chance for me to master the technique, but just as expected, it was not easy. I messed up the flipping part and my omelet came out wrinkled and ugly. The teacher says I should practice with a towel first and then try to make omelets often. Mmm Hmm, and who is going to eat all those cholesterol-laden omelets from my practice sessions? I guess I will have to rely on other people to cook my omelets for the time being.

To accompany the omelet, we also made cabbage rolls. Strange brunch menu if you asked me, but I really liked the cabbage roll, although I’ve made better French toast before.

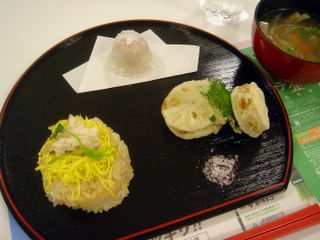
The next cooking menu was a very traditional Japanese meal. Both the presentation and the ingredients attracted me.


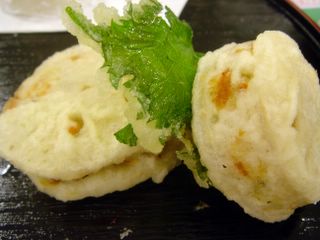
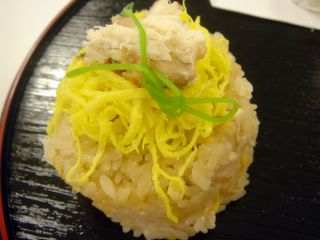
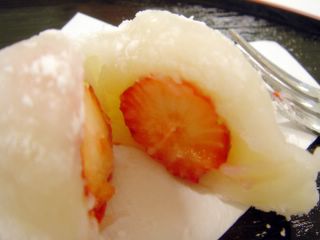
When I was a kid, my grandmother used to sandwich ground pork in lotus root slices and batter fry them (called fried lotus box). We would then eat them dipped in Chinese dark vinegar. I think it was one of my favorite dishes, but then again, back then I loved everything deep fried. The ABC version (蓮根はさみ揚げ), however, was a bit of a letdown. I think the reason for this is three-fold: 1. we used chicken, which, although low fat, was much less flavorful and very dry compared to pork; 2. the tempura batter was not as thick as the one my grandmother used, so it didn’t provide as crunchy a layer; 3. What was I thinking? How can anything replace, or even compare to a childhood memory? Even if it were just as good, I’d still think of three reasons to deny it. But the other two dishes in the menu were just as unmemorable: the Taimeshi (鯛飯, rice with Tai, sorry the name of the fish in English escapes me now) was devoid of any taste of the fish; and the Sawaniwan (沢煮椀, soup with assorted vegetables) was nothing more than a tasteless bowl of vegetable in water. The saving grace of this meal was the strawberry daifuku with white bean paste. (If you remember, I made mame daifuku a couple of months ago, so another reason I chose to take this lesson was to see if I was making the daifuku the right way. I am happy to report that I am.) but even this didn’t make up for the disappointment for having wasted precious time (not to mention money) on food that was so forgetful that I draw a complete blank on recalling any taste at all.

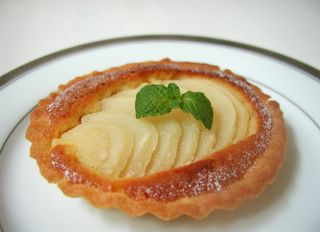
Luckily, I could always count on the desserts to make up for the disappointment. One surprise was the pear tart that I made with my friend Tomoko in a free trial lesson.


Isn’t it cute? I won’t dwell on the fact that one contains close to 500 calories, but suffice it to say that the almond paste and all that butter made this one yummy little tart. My in-laws couldn’t stop saying good things about it and Jason enjoyed it too until I told him about the calorie content.

The next thing I made was very blah. ABC has this system of making you learn the basic things first before letting you go on to the next level. So in order to learn decorated cakes, I had to make the basic sponge cake. Here it is, nothing fancy, just a sponge cake filled with jam, but it contains no baking powder or baking soda. The cake rose entirely on beaten eggs.


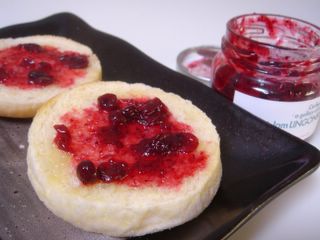
I did manage to squeeze in one bread lesson in April, and I made English muffins. They came out shaped like little hamburger buns, but the taste was definitely English muffin. Too bad I won’t be able to make them at home, unless I buy the muffin rings.


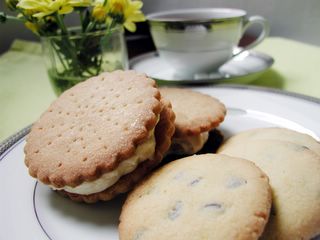
This is my favorite this month, and I saved it for last: rum raisin sandwich and chocolate chip cookies.


This is another basic course before going on to make fancier tarts, but much nicer than the sponge cake. When I went to Hokkaido for the first time a couple of years ago, I discovered a local tea biscuit sandwich with rum raisin cream cheese filling, and what we made in class tasted almost exactly like it, but the filling was softer, with more cream than cream cheese. The process of making the dough was particularly fun. Instead of mixing bowls, we sifted all the dry ingredients onto the countertop, and made it into a large well. We then made a wall with butter, putting the sugar etc. on one side, and eggs on the other (memory is a bit fuzzy now and I can’t remember exactly what went on each side without looking at my notes). Then, slowly, using the heel of one hand, we slowly blended all the ingredients into a wet paste. Some gentle stretching and kneading later, we each had ourselves a ball of very soft buttery dough. After refrigeration, we first rolled and cut out the rounds for the sandwiches, then added chocolate chips to the scrap and made them into cookies. The cookies are not the American type, but tasted good nonetheless. I gave some to a friend’s daughter and she couldn’t stop eating them. Personally, I liked the sandwiches much better, and it’s something I will definitely be making again.

Update: I've posted the dough recipe here.